Waiting on hold is never a fun experience. Save your incoming callers time with call queue callback. Offering a callback option improves the callers' experience when agents are unavailable. Many clients prefer the callback option over long hold times.
What is Sonar call queue callback?
If your oganization's call center is regularly experiencing longer wait times, the Sonar call queue callback feature might be a perfect solution. Office Managers and Call Center Supervisors can set a specific wait time for callers before a pre-recorded message is played. When call queue call back is enabled, the caller will have two options:
- press 2 to leave a voicemail, or,
- press 3 to request a callback.
What happens after a callback is requested?
When a caller selects option 3, the caller can press 1 to confirm the callback number or choose to receive a callback to a different phone number. The system reads back the new number for confirmation. The callback number must be a direct dial, as the system only accepts 10-digit numbers. Numbers requiring an extension are not supported. The net2phone Canada system reads the caller's ID number for an automated agent callback.
When an agent becomes available they receive a call that appears like any other queue call. Upon answering, the agent hears a message to press 1 to confirm the callback. After pressing 1, their phone automatically dials back the original caller. If the agent does not press 1, the call remains on their phone for 10 seconds before redirecting to the next available agent. If only one agent is in the queue, their phone will keep ringing until the call is answered or the caller hangs up, potentially increasing missed call statistics.
How to Enable Call Queue Callback
You must be in your Sonar portal's Manage Organization/Manage Call Center layout to access the Call Queue tab.
Can't find this feature? Contact net2phone Canada!
The call queue callback is only available with net2phone Canada Call Center Bundles. If you want the call queue callback feature for your organization, please reach out to member of our Success Team to discuss a bundle upgrade.
Email success@net2phone.ca, and a team member will respond within 1 business day to schedule a call.
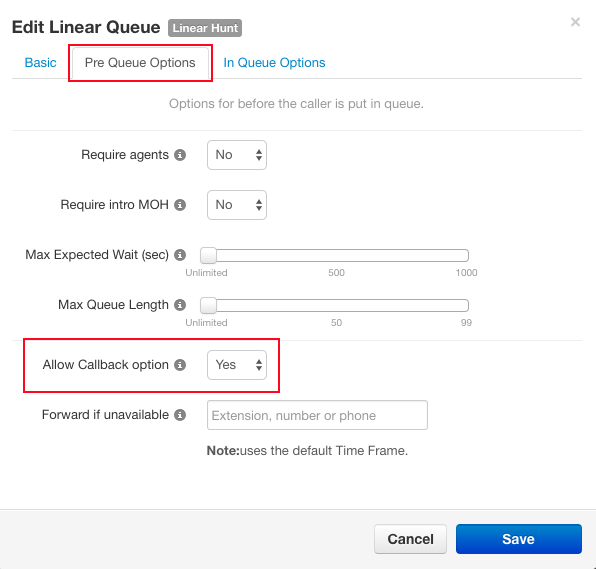
Once callback is enabled, you will see the feature in the "Pre Queue Options" when configuring call queues in the Sonar portal.
1. Navigate to the Call Queue tab.

2. Choose the queue to which you want to enable the callback feature and click the queue's name. Ensure you are in the Pre Queue Options tab and change the Allow Callback Option to Yes.
4. Click Save.