Call queues, sometimes called “ring groups,” help you create call flows to organize and manage incoming calls to a call center, ensuring calls get answered in the correct order. Using Sonar Call Queues, learn how to distribute calls to available agents, manage wait times, and prioritize calls based on importance.
Notes for Managing Call Queues
Call queue extension numbers are typically four digits and begin with 88 (agent queues) and 89 (call park).
Call queues can also be listed in the Users section since they have extensions associated with them. If you don't want to see call queue extensions in your user list, ensure that the checkmark for Hide System Users is enabled.

You can edit agents and music-on-hold using the icons in a call queue list.

Access Call Queues in Sonar
You must be in Manage Organization/Manage Call Center to access the Call Queues tab.
Manage Organization: Office Manager View
The examples within this article are from an Office Manager Account. Office Managers will have more tabs in their Manage Organization view.
- Log in to the Sonar portal with Call Center Supervisor or Manage Organization credentials.
- Click the Call Queue tab.

Creating New Call Queues
During the onboarding process, a net2phone Canada agent will help you create call queues and define your call flow.
Call Queue Number System: 88##
Call queues should be part of the 8800 series. For example, your billing queue could be 8801, and your customer service could be 8802.
Call Park Number System: 89##
Call park queues must be part of the 8950-8959 numbering system to ensure they work as expected; for example, 8951.
- Click the Add Call Queue button.
- Enter the name, extension, and call queue type.

Call Queue Types
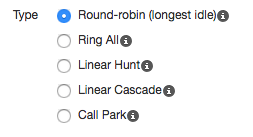
There are five types of call queues.
Round-robin – Routes callers to the available agent who has been idle the longest.
Ring All – Routes callers to all available agents simultaneously.
Linear Hunt – Routes callers to available agents in a predefined order.
Linear Cascade – Routes callers to groups of available agents in a predefined order.
Call Park – Places the caller on hold until an agent retrieves them. Only basic editing options are available for this type.
Queue Options
Clicking the call queue name accesses all options except queue agents.
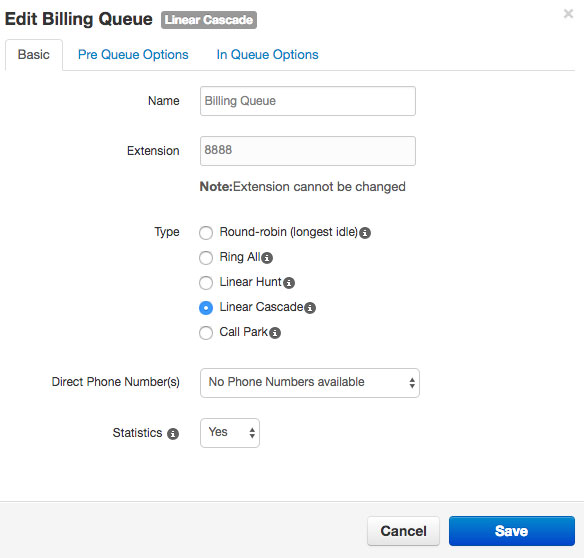
Basic – edit call queue name, type, direct phone number(s), and statistical reporting.
Pre-Queue Options – options for what happens to the call before being put in the queue.
In-Queue Options – options for when callers are queued and waiting to be routed to agents.
Queue Agents – edit additional features specific to individual agents in a call queue; to access agent options, you must click the agent icon on the right, not the queue name.
When editing a queue, you will find 4 subtabs with different configuration options; click the tabs below to reveal option details.
Basic Options
The basic options are the same regardless of the call queue type you have chosen. You can change the name of a call queue but not the extension number.
| NOTE: If you want to change or add an extension number you can contact net2phone Canada directly. For immediate assistance, you can contact our Technical Support Team by dialing 611 from a net2phone Canada device or by calling 1-877-498-3772 and choosing option #3. Emails will be responded to within 1 business day and can be sent to support@net2phone.ca. |
Name – the name of the queue.
Extension – the extension of the queue.
Type – choose between five call queue types.
Direct Phone Number(s) – displays all phone numbers associated with the call queue.
Statistics – choose if you want to collect statistics for a call queue.
Pre-Queue Options
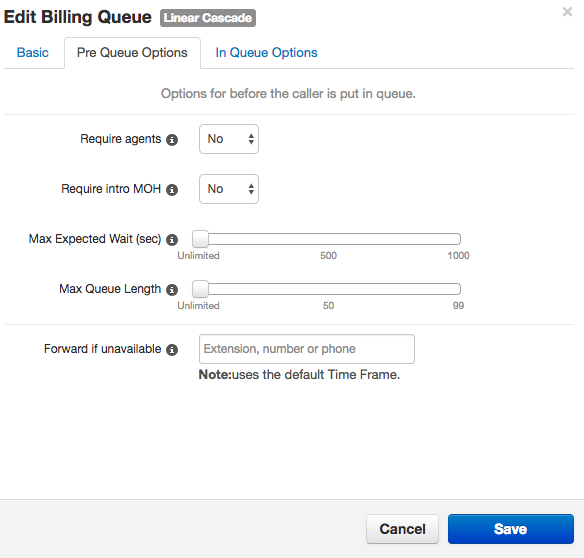
The Pre Queue Options subtab will offer slightly different configuration options as the flow of each queue type differs.
Require Agents – Ensure at least one agent is online before sending a caller to the queue.
Require intro MOH – Play music-on-hold fully before attempting to reach agents.
Max Expected Wait – Set the maximum expected wait time before the queue becomes unavailable.
Max Queue Length – Define the maximum number of callers allowed in the queue.
Forward if unavailable – Enter an extension or phone number to forward callers if the queue is full or wait time is exceeded.
In-Queue Options
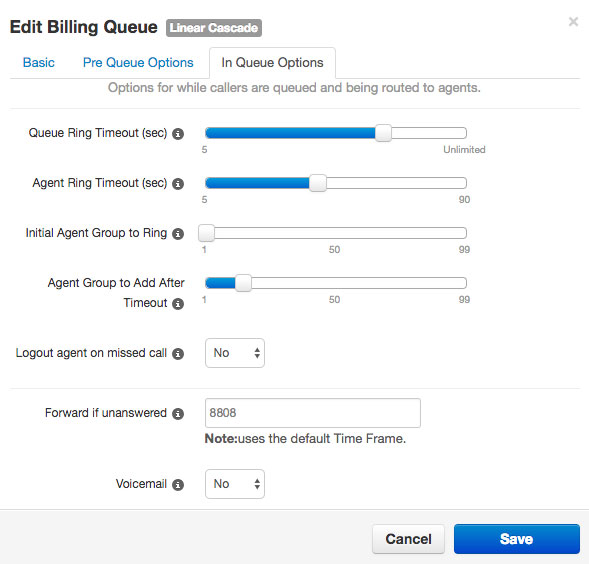
The In Queue Options subtab will offer slightly different configuration options as the flow of each queue type differs.
Queue Ring Timeout – Duration before following an exit option.
Agent Ring Timeout – Duration before moving to the next available agent.
Initial Agent Group Ring – (Linear Cascade) Rings the first group of agents.
Agent Group to Add After Timeout – (Linear Cascade) Adds more agents after timeout.
Logout Agent on Missed Call – Option to log out agents who miss calls.
Forward if Unanswered – Forward callers if unanswered within the timeout period.
Voicemail – Option for callers to leave a voicemail if unanswered.
Agents Options
The edit agent options are accessed by clicking the agent icon in the call queue rather than by clicking the call queue name.

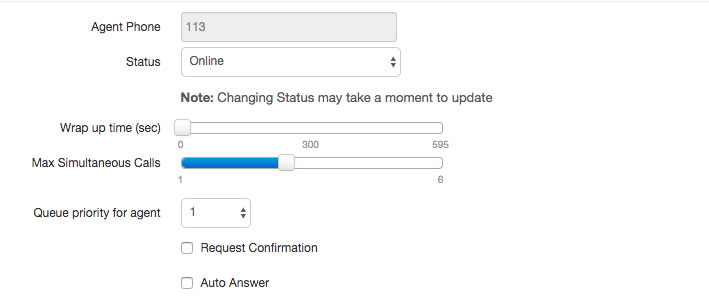
Agent Phone – Displays agent extension or name.
Status – Set agent status to online or offline.
Wrap-up time – Set the time before an agent can take another call.
Max Simultaneous Calls – Maximum active calls an agent can receive.
Queue Priority for an Agent – Specify priority if assigned to multiple queues.
Request Confirmation – Prompt agents to accept or reject calls.
Auto Answer – Automatically answer calls (desk phones only).
Adding Agents to Call Queues
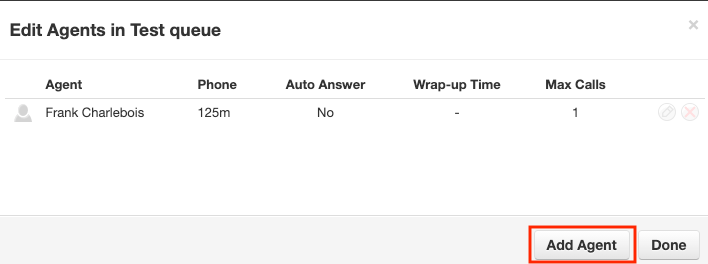
When editing agents from a specific call queue, you can find a list of all users within the call queue, listed below the agent you are currently editing.

You can add agents by clicking the Add Agent button in the bottom right corner of this pop-up menu.
Adding and Editing Agents in Call Queues
From the Edit Agents configuration menu, you can:
- add single or multiple agents,
- set their online status,
- change their wrap-up time,
- adjust the max simultaneous calls,
- set the priority for the agent(s), and,
- request confirmation,
- and auto-answer.
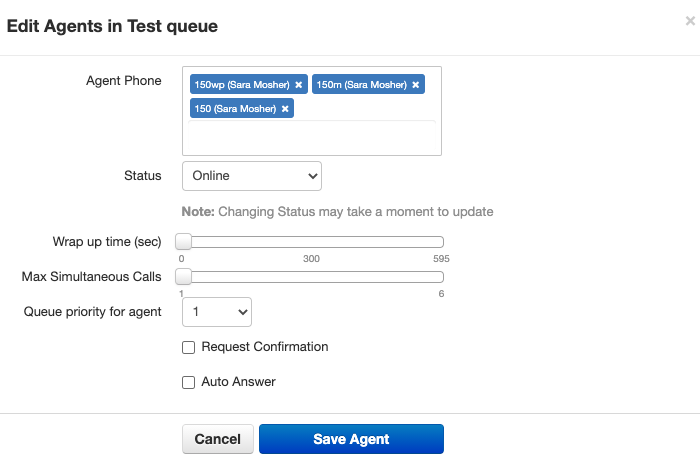
Click Save Agents before navigating away from the configuration menu.
Delete Call Queues
Click the red X in the call queue row to delete a call queue. Be mindful—you cannot undo this action.

Notes for Managing Call Queues
Call queue extension numbers are four digits and begin with 88 (agent queues) and 89 (call park).
Call queues can also be listed in the Users section since they have extensions associated with them. If you don't want to see call queue extensions in your user list, ensure that the checkmark for Hide System Users is enabled.

You can edit agents and music-on-hold using the icons in a call queue list.

Unsure of creating call queues? Contact Support!
For immediate assistance, you can contact our Technical Support Team by dialling 611 from your net2phone Canada device or by calling 1-877-498-3772 and choosing option #3. Emails will be responded to within 1 business day and can be sent to support@net2phone.ca.
