Create a New Voicemail Greeting
Creating a personal business voicemail greeting offers several benefits, enhancing your professional image and ensuring effective communication. Check out our blog: 10 Professional Voicemail Greetings for Your Business Needs, for ten script templates!
You can create a voicemail greeting in three ways:
- upload an existing .wav or .mp3 file,
- record a new greeting, and,
- use text-to-speech to generate a voicemail greeting.
Voicemail Greeting Tips!
Test your voicemail greeting by calling your own extension.
Keep it Concise
Aim for a greeting that is no longer than 20-30 seconds. Your greeting will only play once, so don’t speak too quickly and repeat any vital information that may need to be written down.
Be Clear and Direct
Clearly state your name, your business, and the purpose of the voicemail inbox.
Provide Instructions
Guide callers on what information to leave and what to expect in terms of response time.
Update Regularly
Ensure your voicemail greeting is up-to-date, especially if your availability changes frequently.
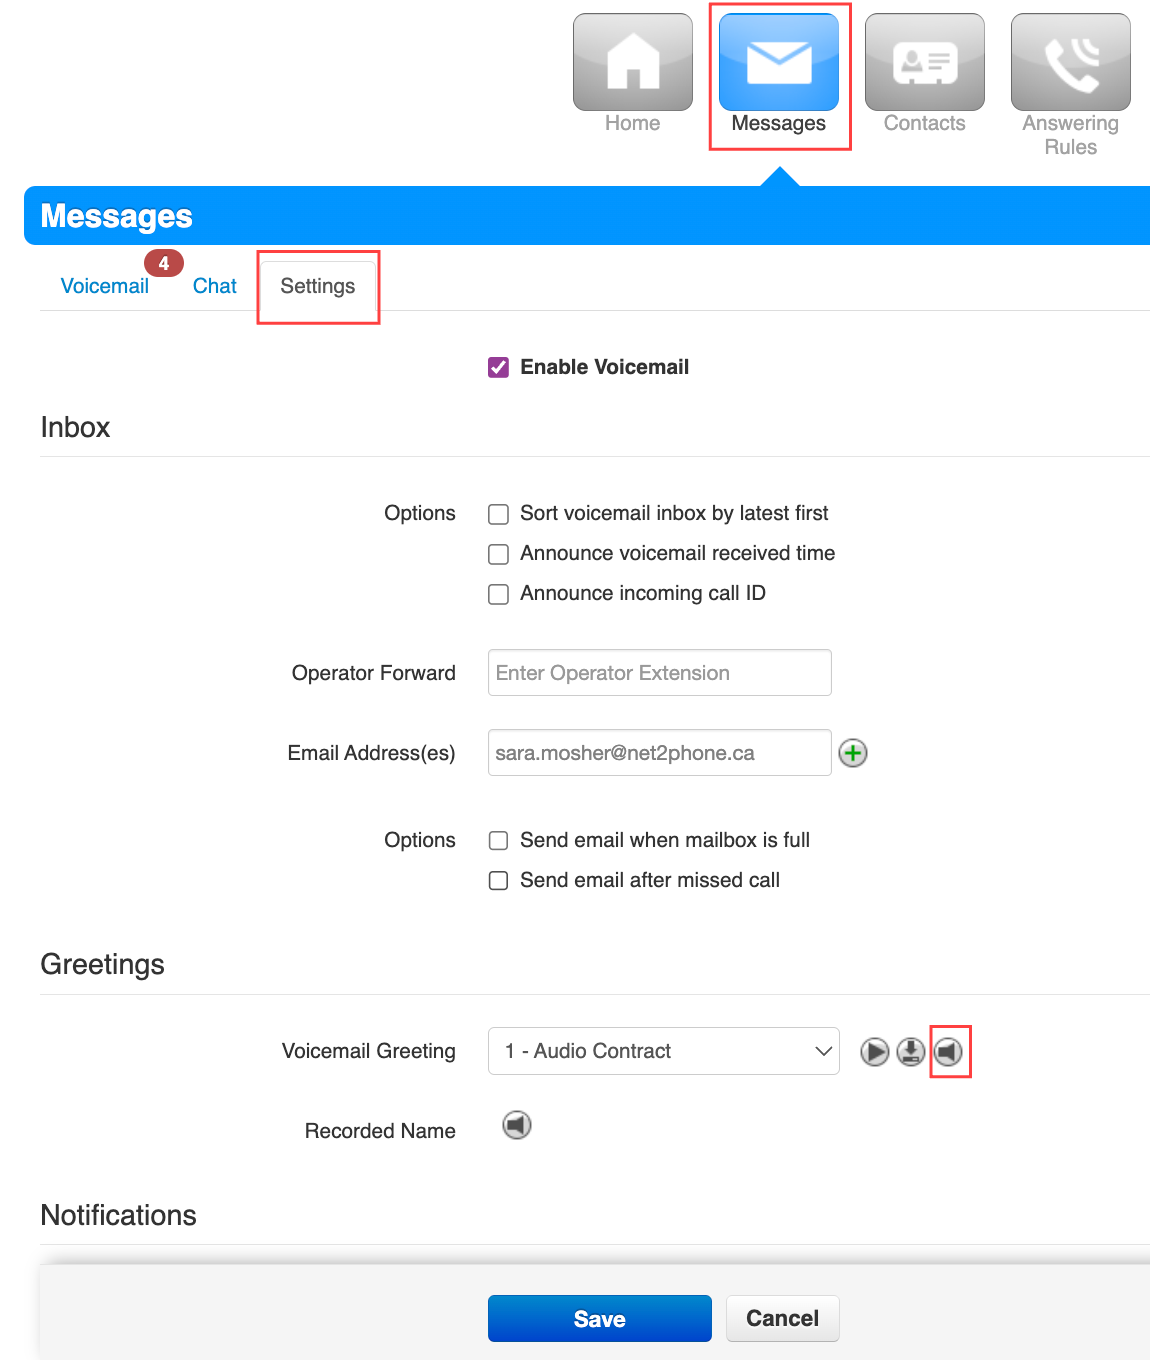
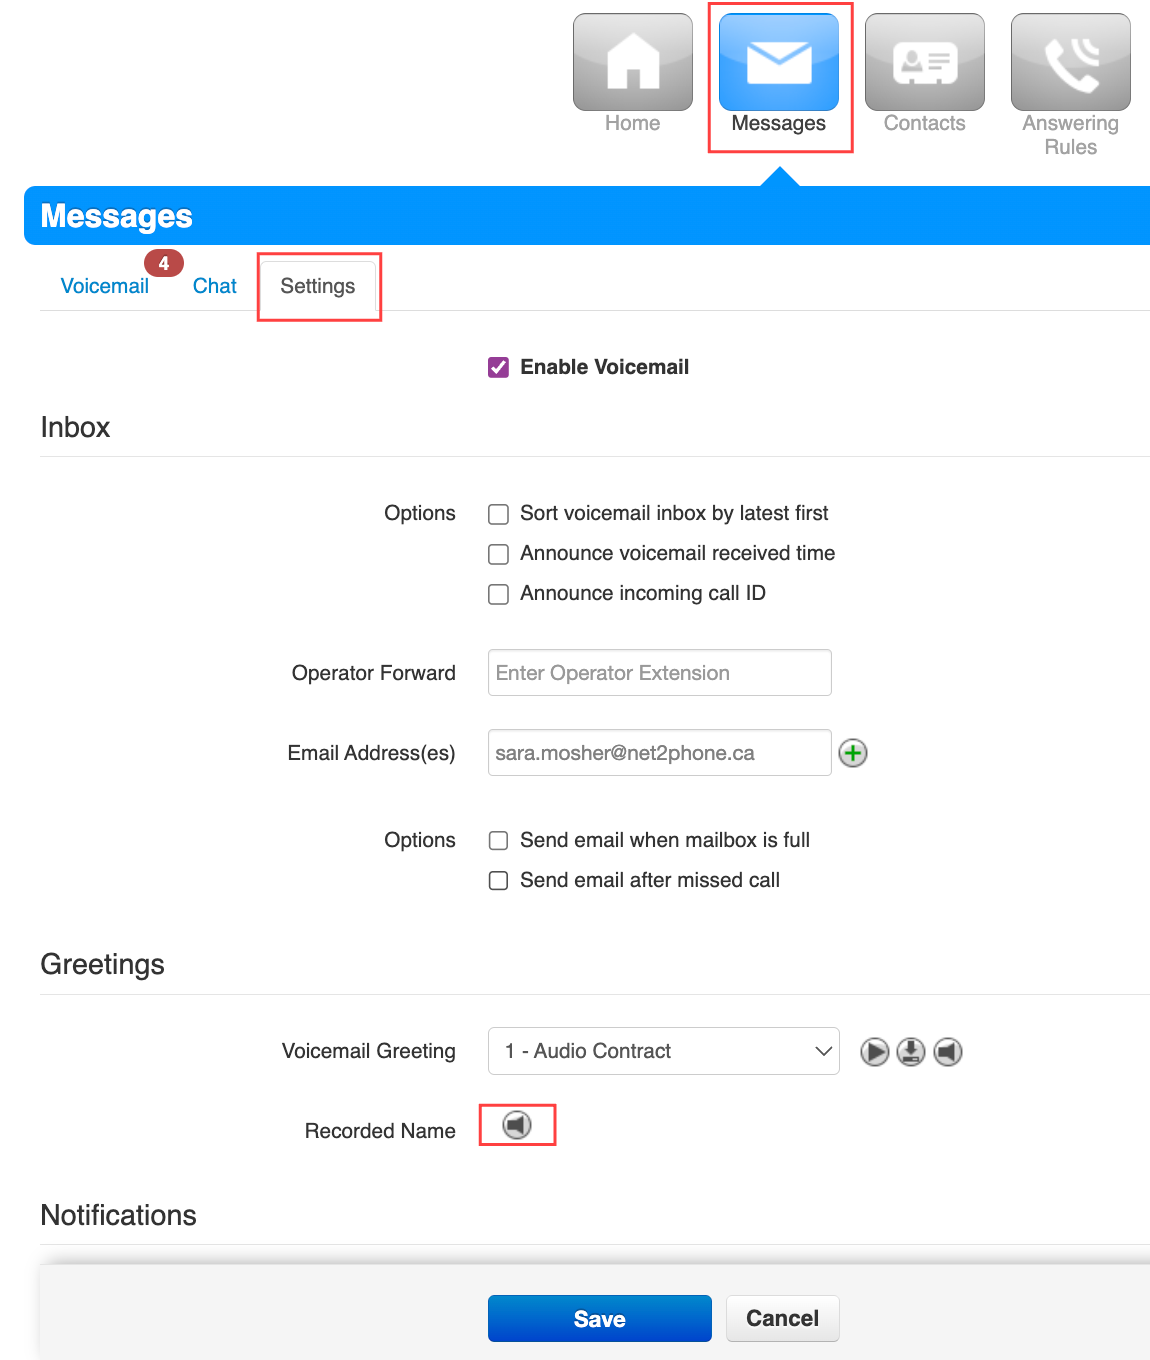
How To Upload A New Voicemail Greeting
Uploads must be in .mp3 or .wav format. Office Managers and Account Center Supervisors must be in My Account to access the Messages tab.
- Click the Messages tab in your Sonar portal.
- Click the Settings sub-tab on the left side.
- Scroll down to the Greetings section and click the speaker icon (manage) next to Voicemail Greeting.
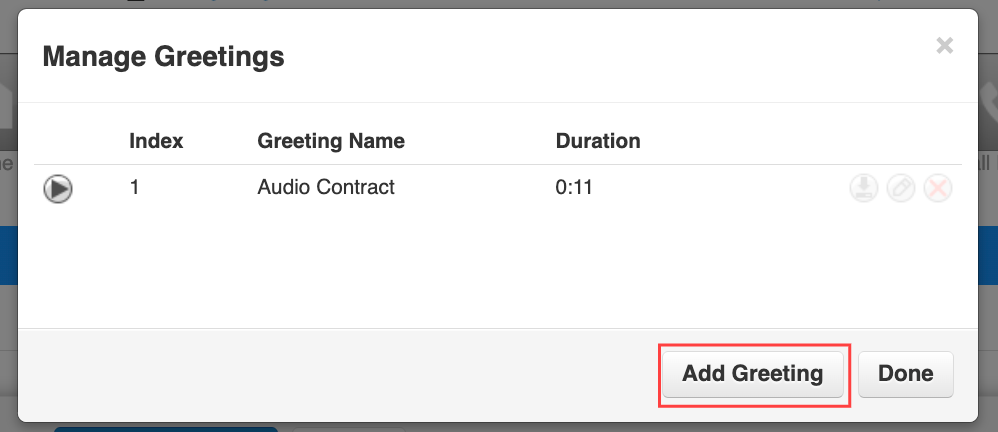
- Click Add Greeting.
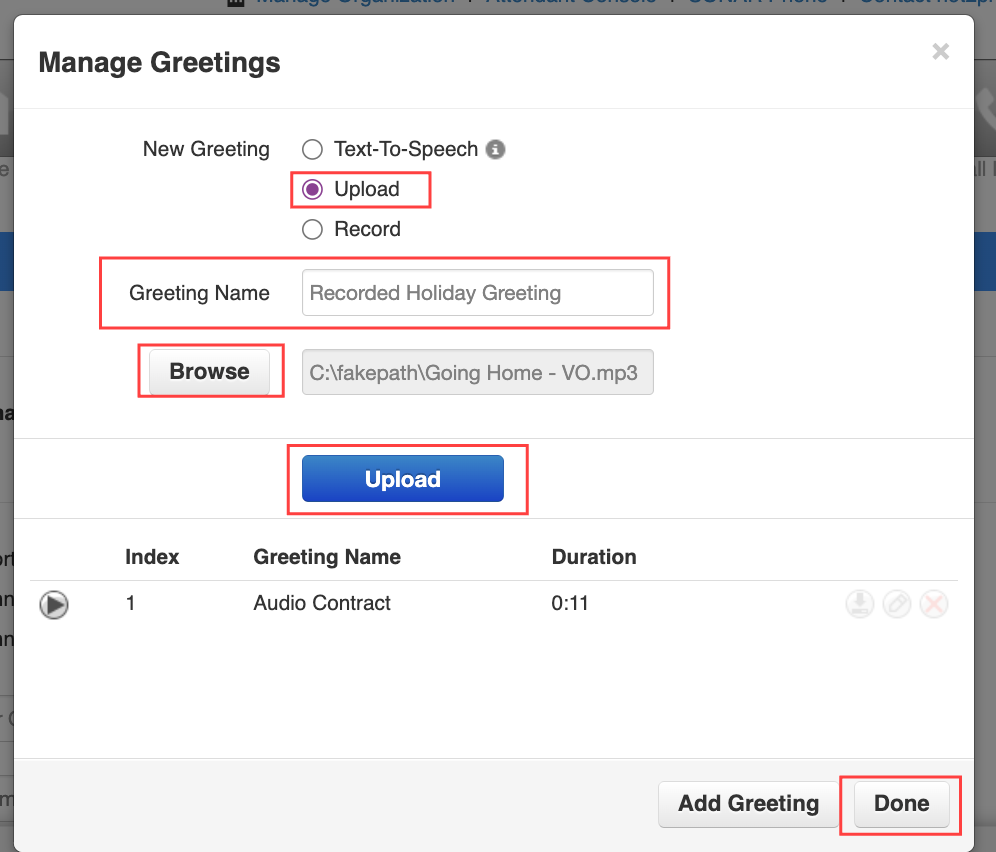
- Click the radio button for Upload.
- Name your greeting.
- Click Browse.
- Select the file you want to upload.
- Click the Upload button.
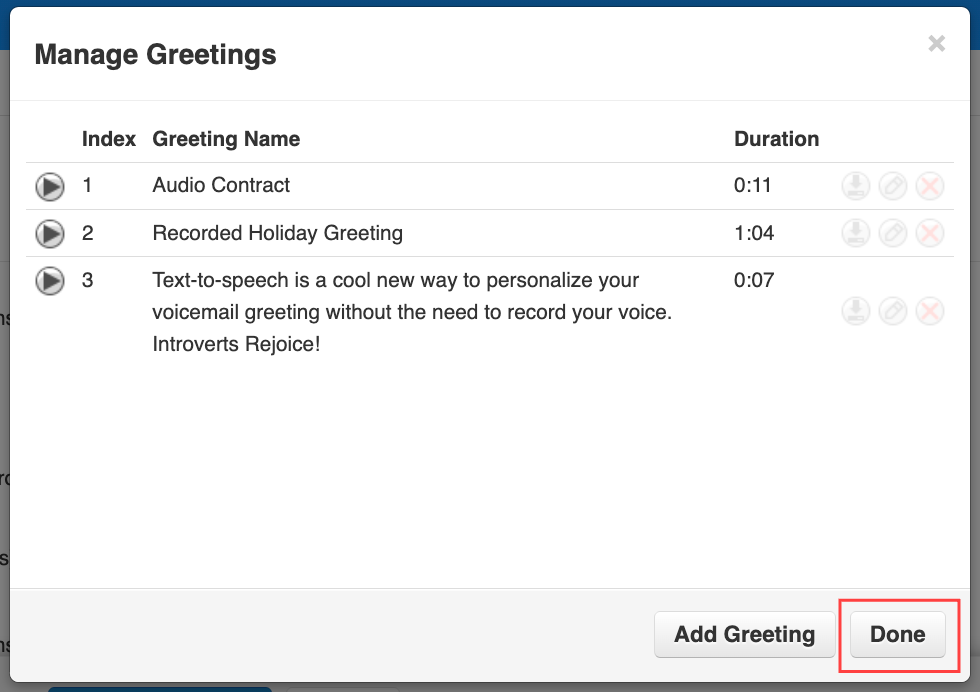
You will now see the new greeting’s index, greeting name, and duration in your greetings list. - Click Done to save.
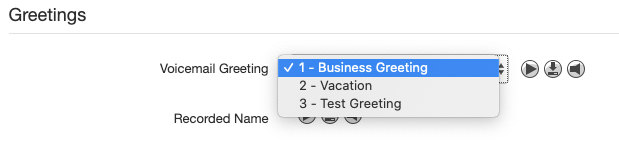
Activate your voicemail greeting!
If you want to activate your new greeting, in the Messages, Settings section, under Greetings, click the drop-down menu and select your new greeting.
How To Record A New Voicemail Greeting
Remember that recording a message using a third-party device (such as a mobile phone) may degrade the quality.
- Click the Messages tab in your Sonar portal.
Office Managers, Site Managers, and Call Center Supervisors must be in My Account to access the Messages tab. - Click Settings on the left side.
- Scroll down to the “Greetings” section and click the speaker icon (manage) next to Voicemail Greeting.
- Click Add Greeting.
- Select the Record radio button.
- Enter the number or extension of the phone you wish to record the greeting on.
Note: If you have multiple devices, you must specify which device to call; the letters following your extension indicate the device, i.e., 101wb for the webphone/Sonar phone or 101m for the mobile app. - Name the greeting.
- Click Call and follow the instructions given to you on the phone.
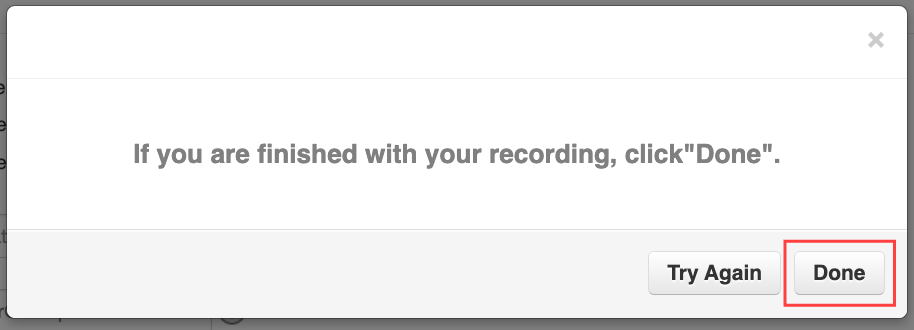
- Record your message after the beep.
- Hit # to accept your new greeting.
You will now see the new greeting’s index, greeting name, and duration in your greetings list.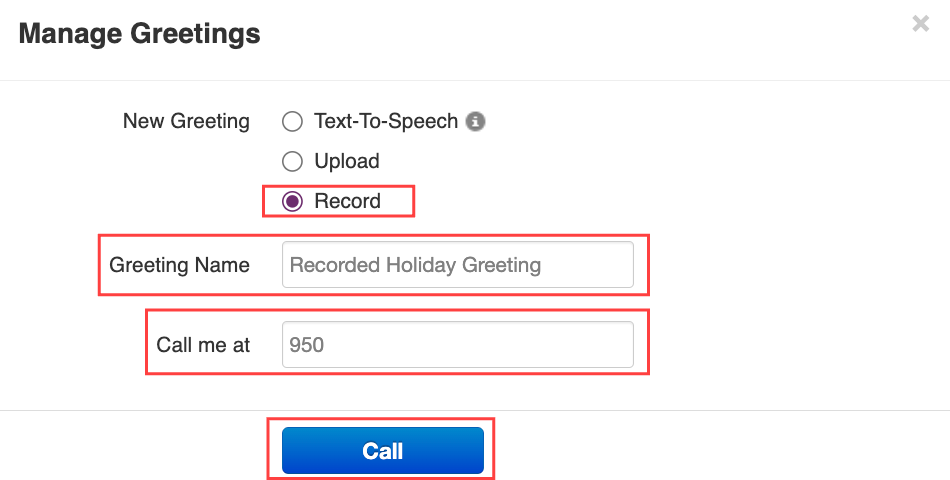
- When you are finished, click Done to save.
Activate your voicemail greeting!
If you want to activate your new greeting, in the Messages, Settings section, under Greetings, click the drop-down menu and select your new greeting.
How to Generate Text-to-Speech for Voicemail Greetings
Text-to-speech is a quick way to record new greetings. You can choose from multiple voice options, including Canadian-French!
- Click the Messages tab in your Sonar portal.
Office Managers, Site Managers, and Call Center Supervisors must be in My Account to access the Messages tab. - Click Settings on the left side.
- Scroll down to the “Greetings” section and click the speaker icon (manage) next to Voicemail Greeting.
- Click Add Greeting.
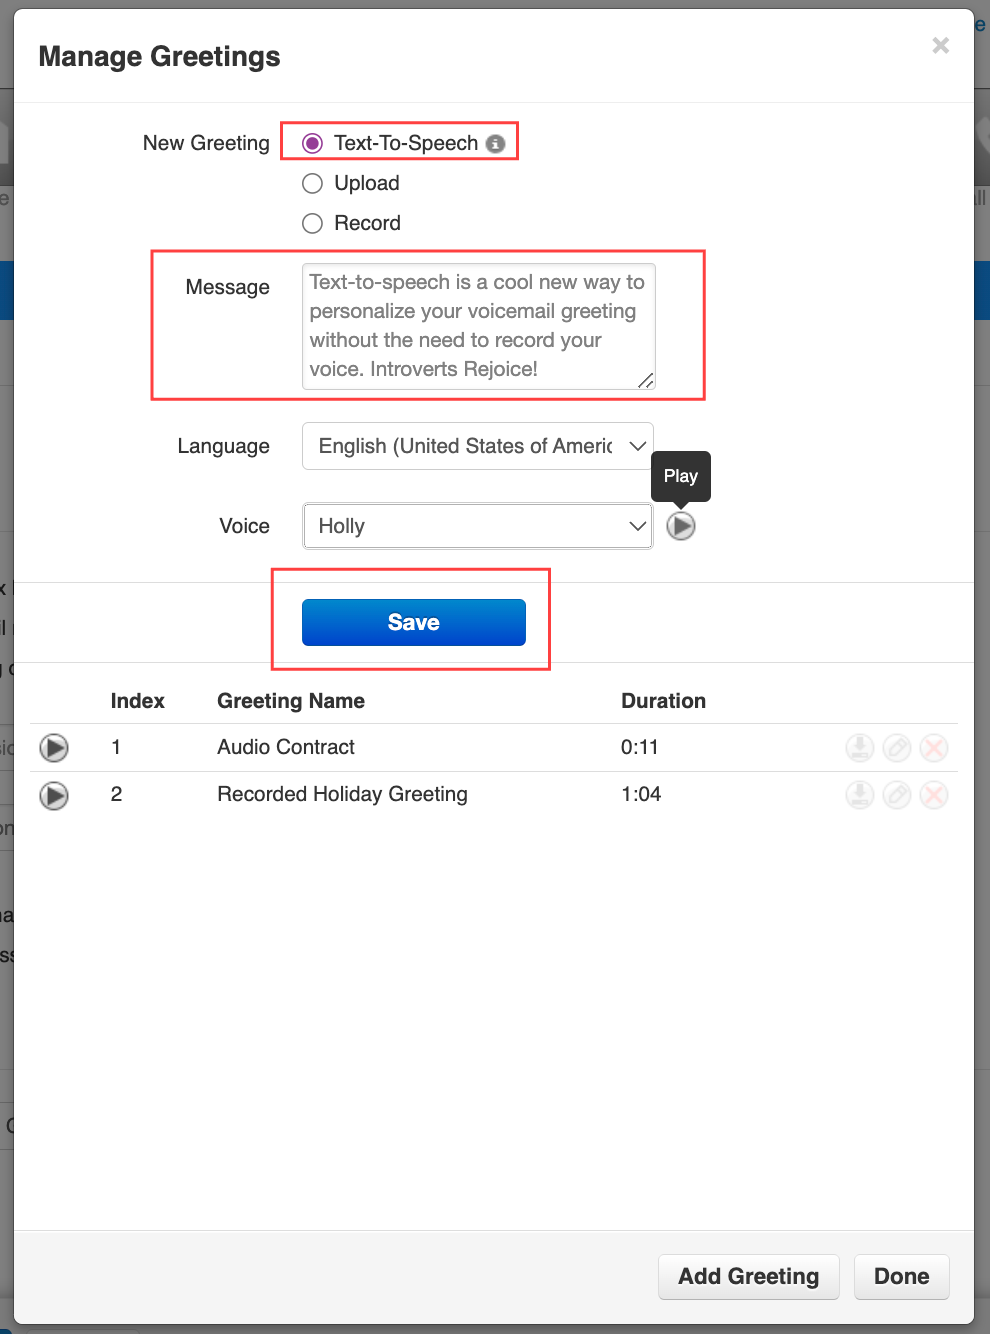
- Click the radio button for Text-to-Speech.
- Text your message in the textbox.
- (Optional) Choose English or French, and your preferred voice.
- (Optional) Click the Play button beside the voice drop-down menu to listen.
- Click Save, in the upper section of the Manage Greetings settings pop-up.
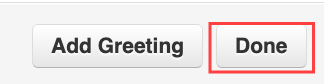
- Click Done in the lower section of the Manage Greetings settings pop-up to save.
Don't Forget to Activate your Voicemail Greeting!
Creating a New Voicemail Greeting does not automatically activate the greeting. If you want to activate your new greeting, return to the Messages tab and select your saved Greeting from the drop-down menu.
Mobile Users: Pro Tip!
If you have multiple voicemail greetings saved, you can update your active greeting from the Sonar Mobile app!
Record Your Name For Auto Attendant Directory
If your company uses an auto attendant directory, you'll need to record your name. Adding your recorded name—even with text-to-speech—allows callers to find your extension quickly.
How To Record Your Name for Your Company Directory
All Sonar users have a Messages tab; Office Managers and Call Center Supervisors must be in My Account to access the Messages tab. Follow these steps to record your name so callers can find you in the company directory:
- Click on the Messages tab in your Sonar portal.
- Click on the Settings subtab.
-
Under the Greetings section, click the speaker icon next to Recorded Name.
- Select Record.
-
Enter the number or extension you want to record your name on.
If you are entering an external phone number, it must be 10 digits with no spaces, dashes, or brackets (e.g., 3211234321)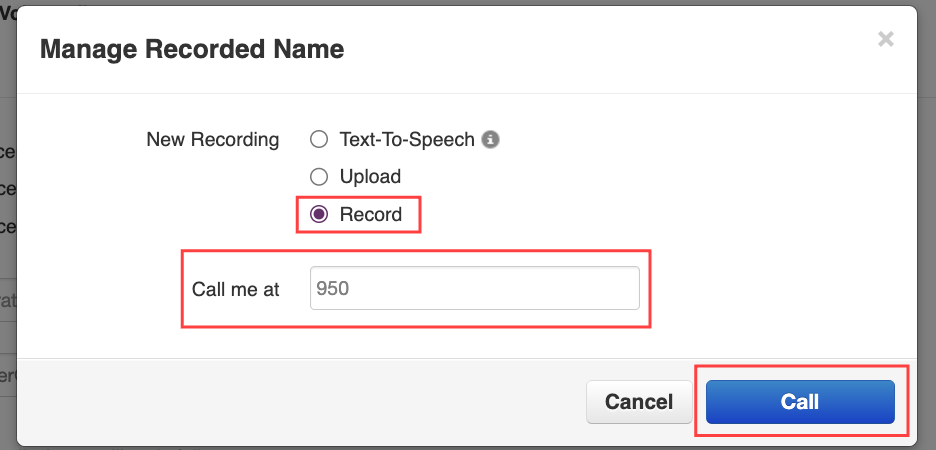
-
Click the Call button and follow the voice prompts.
- Record your message after the beep.
- Hit # to accept your new greeting.
-
Click the Done button to save.
How to Use Text-To-Speech for your Company Directory
- Click on the Messages tab in your Sonar portal.
- Click on the Settings tab.
-
Under the Greetings section, click the speaker icon next to "Recorded Name."

- Click the radio button for Text-to-Speech.
-
Enter your message, choose English or French, and your preferred voice.
Click the play button beside the Voice drop-down menu to hear the message.
- Click Save.
Pro Tip: Test your New Directory Option!
Test your company directory name by calling into your business line and following your auto attendant!
Leave a Voicemail or Press Zero for Operator Forward
Operator Forward allows callers to transfer their call to a designated destination—such as a call queue, auto-attendant, extension, or external number in a 10-digit format—by pressing 0 during your voicemail greeting.
Inform Callers About Operator Forward
There is no automated message informing callers Operator Forward is enabled; therefore, you must include this information in your personal voicemail greeting.
To ensure callers are aware of Operator Forwarding, include a custom voicemail greeting, such as:
You’ve reached [Your Name/Business]. If you would like to leave a voicemail, please do so after the tone. To reach [another department or extension], please press 0.
Call Flow with Operator Forward
Every call flow must have a final destination to avoid automated forwarding loops.
- The caller dials an extension number.
- They hear the called party's voicemail greeting (which should announce the "press 0" option).
- If the caller presses 0, the call is transferred to the preconfigured destination.
- If the caller does not press 0, they are prompted to leave a voicemail.
Configuring Operator Forward in Sonar
Office Managers and Call Center Supervisors must be in My Account to access their personal voicemail settings. To configure Operator Forward for a user, you can navigate to the user's voicemail settings within the Users tab of Manage Organization.
- Log in to the Sonar Client Portal.
- Click the Messages tab.
- Click the Settings subtab.
- Configure the Operator Forward Destination to route calls to one of the following:
- A specific call queue
- An auto attendant menu
- A different extension
- An external number (must be in 10-digit format)
- Click Save.

Send Calls to Voicemail with a Do-Not-Disturb Answering Rule
The Do Not Disturb (DND) feature automatically sends all incoming calls to voicemail, allowing you to take a break or help you focus without interruptions. DND helps balance accessibility and efficiency, making it essential for any busy professional.
How to Create a New DND Answering Rule
Identify your Time Frame First!
Every answering rule must be linked to a time frame. The example below uses an Always Time Frame with Always Forward.
If you do not have a time frame to link your answering rule with, you must create a new one.
Office Managers and Call Center Supervisors must be in My Account to access their Answering Rules.
- From the Sonar portal, click the Answering Rules tab.
- Click the Add Rule button.
You can also edit an existing rule by clicking the pencil icon next to the name.
- In the popup window:
- Select a preexisting time frame.
- Click the checkbox next to Do Not Disturb.
- Click Save.
- Prioritize your DND answering rule: use the arrow sliders to move the desired answering rule to the top of the list.
Pro Tip!
You can identify which answering rule has DND enabled by the minus-circle icon.

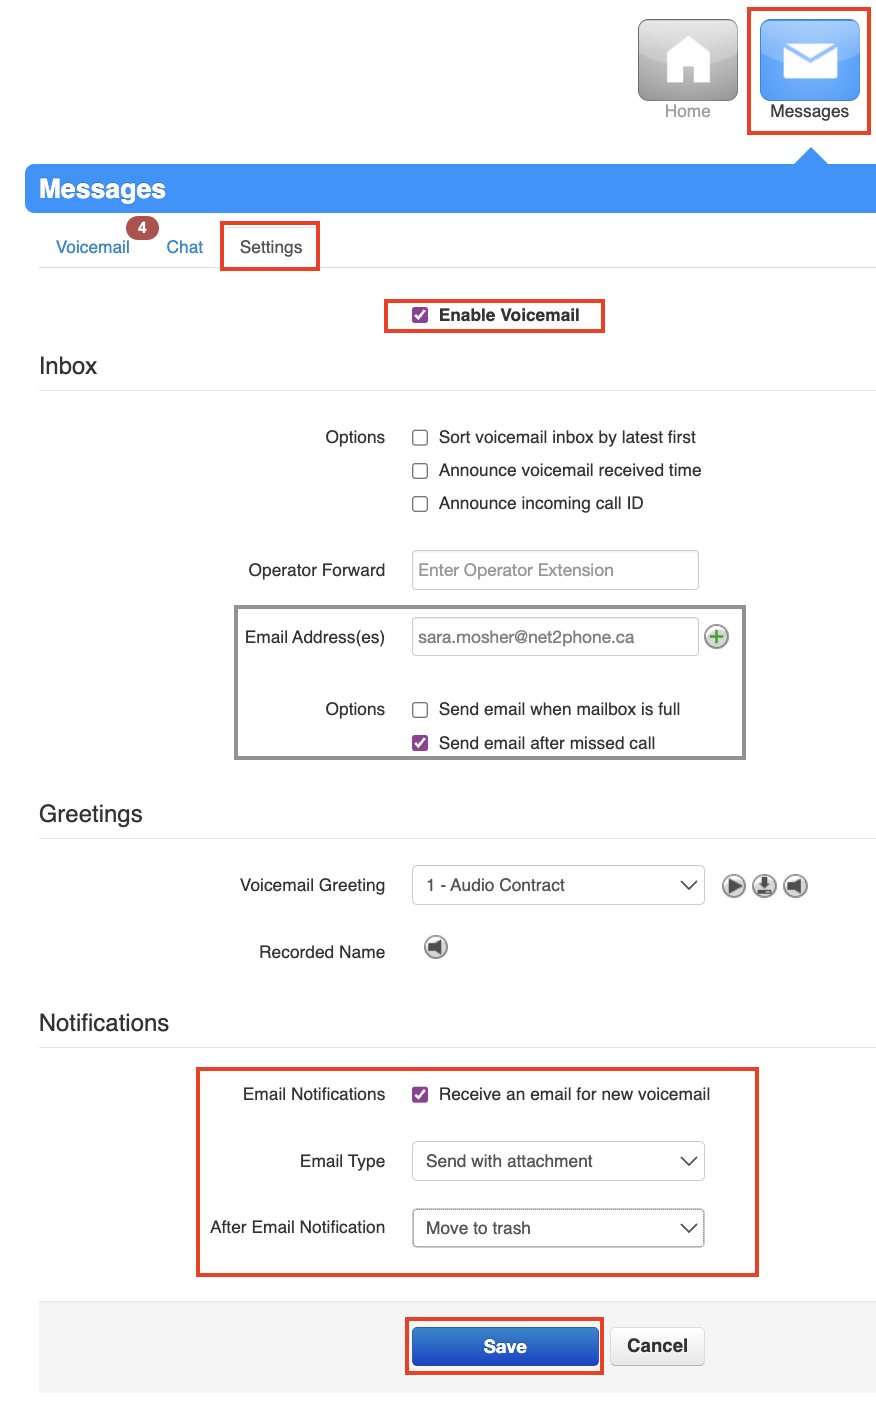
Enable Voicemail-to-Email in Sonar
Voicemail-to-email allows you to receive your incoming voicemail message through your designated Sonar email. Voicemail message emails include transcribed text as well as the original audio recording. By default, voicemail-to-email is enabled for all Sonar users.
Your Designated Voicemail-to-Email
Double-check that the email address listed in your profile is the email you want your voicemail messages to be delivered; learn how to find your designated Sonar email in Sonar.
Enable or Disable Voicemail-to-Email in Sonar
Office Managers, Site Managers, and Call Center Supervisors must be in My Account to access their Messages tab.
- Click the Messages tab.
- Click the Settings subtab.
- Ensure that your voicemail is enabled (at the top).
- (Optional) Under the "Inbox" section, click the checkmark for Send email after missed call.
Note: Your inbox will never be full when you have voicemail-to-email enabled. - (Optional) Add a secondary email address by clicking the green plus button.
- Under the "Notifications" section at the bottom, click the checkmark to Receive an email for a new voicemail.
Note: “Move to trash” indicates that your voicemails will no longer be saved on your desk phone. - Click the Save button when finished.
Success: Test your Voicemail-to-Email!
Using a different extension or external phone number, call yourself and leave a test voicemail to see firsthand how your new Sonar voicemails are received.
If you are experiencing difficulties receiving voicemail emails contact our support team. For immediate assistance, you can contact our Technical Support Team by dialing 611 from your net2phone Canada device or by calling 1-877-498-3772 and choosing option #3. Emails will be responded to within 1 business day and can be sent to support@net2phone.ca.
Voicemail-to-Email Transcription
VOICEMAIL TRANSCRIPTION
Voicemail transcriptions are included for your convenience, the clarify and langu...
Voicemail transcriptions are provided for your convenience. The clarity and language of the speaker will directly impact the accuracy of the transcription. If a transcription appears unclear, you can always access the voicemail audio recordings in your email notification.
Voicemail transcriptions are limited to a maximum of 60 seconds.
Your voicemails will be transcribed in the language selected in your client portal. Sonar offers three language options: English (United States), Spanish (Mexico), and French (Canada).

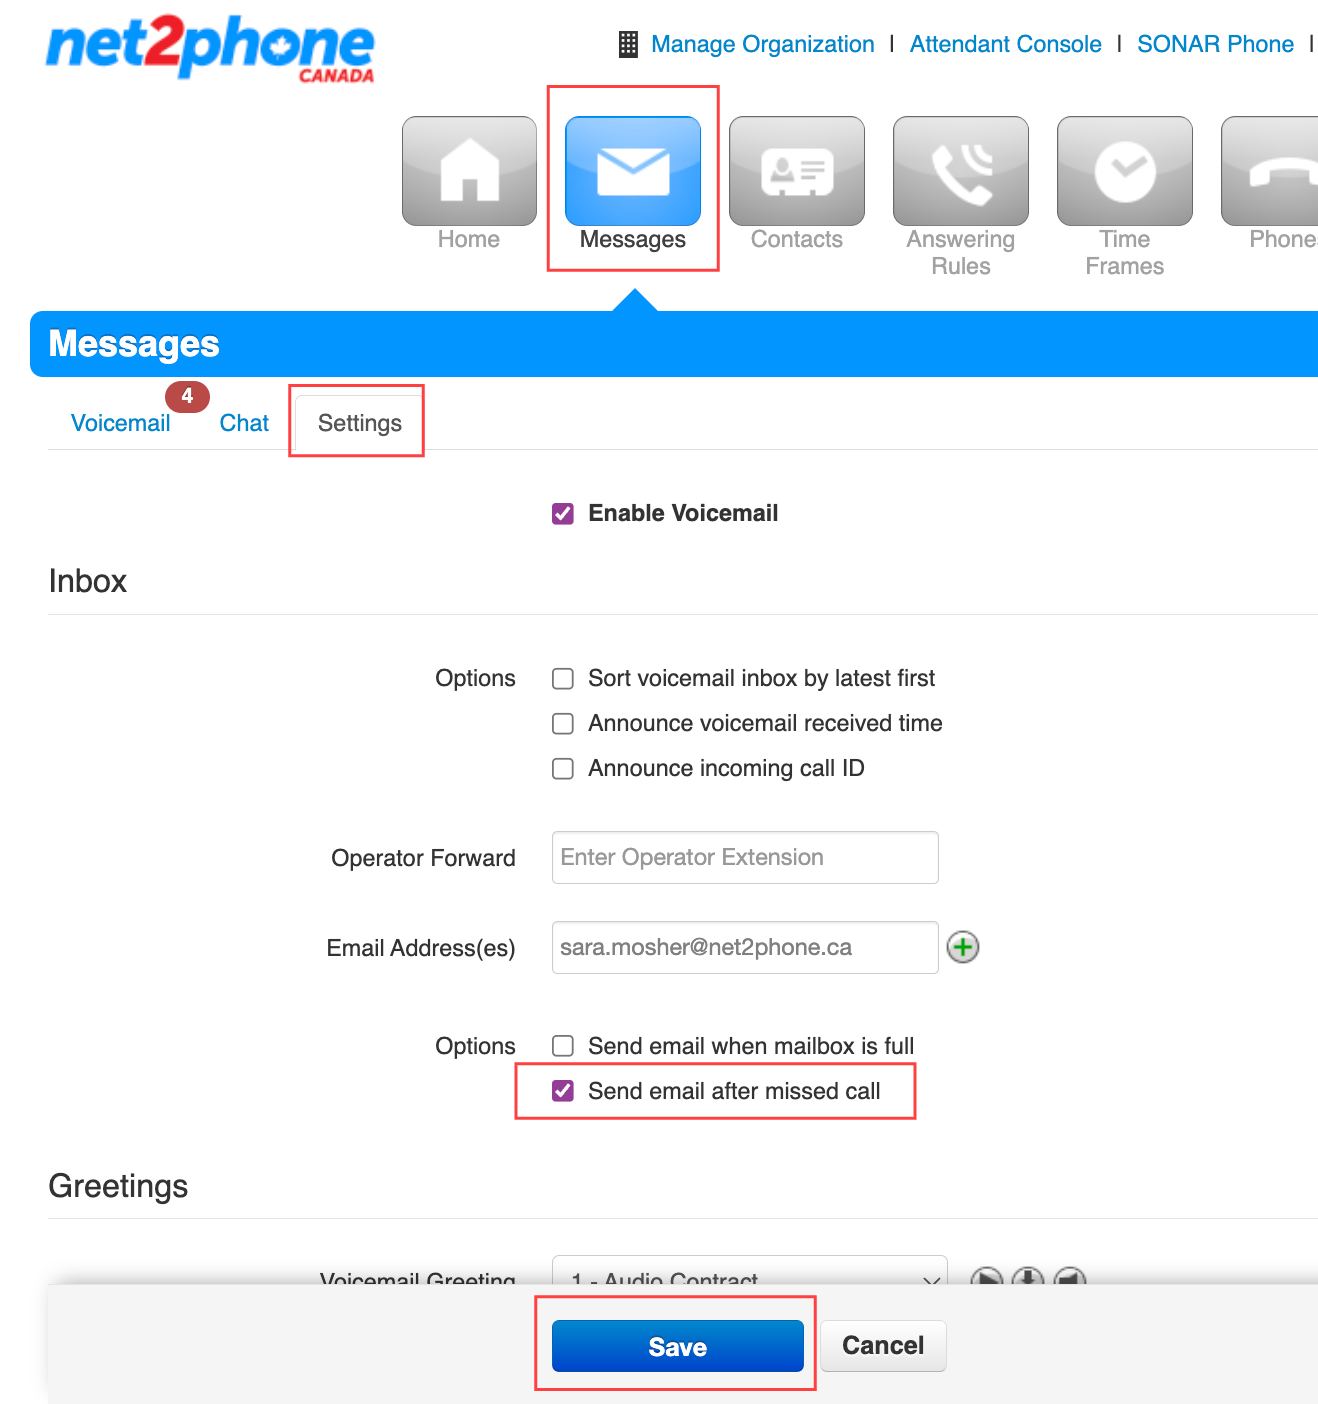
How To Enable Email Notifications For Missed Calls
Are you worried about forgetting missed calls? Enable email notifications! If you have Unified Messaging enabled, you automatically get email notifications for new voicemail messages.
How To Enable Email Notifications For Missed Calls
Office Managers and Call Center Supervisors must be in My Account to access the Messages tab.
- Log in to Sonar using your net2phone Canada credentials.
- Click the Messages tab.
- Click the Settings sub-tab.
- Under the Inbox section, click the checkbox for Send email after missed call.
- Click Save.
Voicemail-to-Email Pro Tips!
- Double-check your designated Sonar email address is correct.
- Enable unified messaging to get your voicemails to your email.
- Enable Operator Forward to give callers a forwarding option when they press zero.
- Click "send email when mailbox is full" if you do not have unified messaging turned on.
Listen to your Voicemails from an External Phone
Planning to be out of the office?
Consider switching to Unified Messaging, i.e., sending voicemails to email. All your voicemails will be sent to your designated email address with a voice-to-text generated transcription, as well as an audio recording so you can still listen to the original message.
Listen to your Voicemails from an External Phone
If you need to check a voicemail message and do not have voicemail-to-email enabled, you can check your voicemail messages from an external phone number, like a cell phone or home landline.
- Call your office extension from an external phone.
- Let the call ring to the voicemail greeting.
- Press star (*) while your voicemail greeting is playing.
- You will be prompted to enter your extension’s voicemail PIN before accessing your voicemail inbox.
After entering your PIN, you will be able to listen to your voicemails as if you had dialled *98 from your net2phone Canada desk phone!
Send Voicemail Messages to Internal Extensions
If you need to forward a voicemail message to another net2phone Canada device, and you are not using voicemail-to-email, you can follow the steps below to send a voicemail message to a different Sonar device.
- Listen to the voicemail message (*98 to access voicemail inbox).
- At any time while the message is playing, press 3 to forward the message.
From the send message menu, you have the following options:- Press 1 to send a message to an individual,
- Press 2 to broadcast to all,
- Press 3 to send to a group.
- (Optional) After pressing 1, you'll be prompted to record an introduction for the voicemail message transfer. After recording, press pound (#).
Example: Hey Anastasia, I got this voicemail but I think it's best suited for you.
If you don't want to record an introduction, wait a few seconds when prompted or press the pound key (#). - Listen to the system's playback of your introduction greeting, as well as your voicemail message again.
- The system will prompt you to press 2 to confirm.
- Enter the destination mailbox (extension number).
- The system will prompt you to press 2 to confirm before finishing the voicemail message transfer.
